2022年10月12日
UVMの環境構築第3回では、ドライバーの定義(作成)方法について解説していきます。
なお、ソースコードはGitHubに公開しています。
目次
UVMの環境構築!シリーズの目次は、第1回 解説編の一番下をご覧ください。
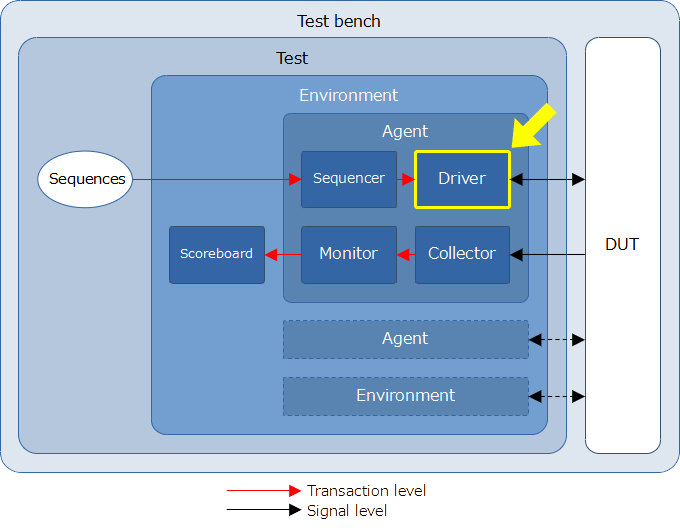
ドライバーはuvm_driverまたはそのサブクラスを継承して定義します。
ドライバーはシーケンサーからトランザクションを取得し、シグナルレベルに変換します。そして、DUTをドライブします。
DUTのドライブはvirtual interfaceを使用します。DUTのポートに接続したinterfaceと、ドライバーに定義したvirtual interfaceはつながっています(やり方はmy_driver_base.svで説明します)。したがって、ドライバーのvirtual interfaceの信号を変化させると、DUTのポートにも反映されます。
ドライバーを定義する際は、DUTによらずお決まりで書くことがあります。したがって、次の手順で記述するとよいです。
また、シーケンサーからトランザクションを取得するTLMポートは、uvm_driverで以下のseq_item_portとして定義されているため、ユーザーが新たに定義する必要はありません。
1 2 3 4 5 6 | class uvm_driver #(type REQ=uvm_sequence_item, type RSP=REQ) extends uvm_component; uvm_seq_item_pull_port #(REQ, RSP) seq_item_port; ... ... endclass |
それでは、ソースコードを見ながら、ドライバーの定義方法について説明します。
my_driver_base.sv
1 2 3 4 5 6 7 8 9 10 11 12 13 14 15 16 17 18 19 20 21 22 23 24 25 26 27 28 29 | virtual class my_driver_base #(type REQ = uvm_sequence_item, type RSP = REQ) extends uvm_driver #(REQ, RSP); VIF_DRIVER vif; /* Constructor */ function new(string name, uvm_component parent); super.new(name, parent); endfunction /* Build phase */ function void build_phase(uvm_phase phase); super.build_phase(phase); if (!uvm_config_db #(VIF_DRIVER)::get(this, get_full_name(), "vif", vif)) `uvm_error("VIF_NOT_SET", {"No interface assigned to ", get_full_name(), ".vif"}); endfunction /* Run phase */ task run_phase (uvm_phase phase); forever begin get_drive_item(); end endtask /* Sub class must implement this behaviour */ pure virtual task get_drive_item(); endclass |
1 2 | /* Typedef */ typedef virtual my_if VIF_DRIVER; |
my_driver_baseはDUTに依存しません。あらかじめmy_driver_baseを用意しておくことで、効率的にドライバーを定義することができます。
my_driver_baseを継承して、DUTに対応したmy_driverを定義します。
my_driver.sv
1 2 3 4 5 6 7 8 9 10 11 12 13 14 15 16 17 18 19 20 21 22 23 24 25 26 27 28 | class my_driver extends my_driver_base #(my_item); `uvm_component_utils(my_driver) /* Constructor */ function new(string name, uvm_component parent); super.new(name, parent); endfunction /* Get transaction and drive DUT in Run phase */ task get_drive_item(); seq_item_port.get_next_item(req); drive_item(req); seq_item_port.item_done(); endtask /* Drive DUT */ task drive_item(input REQ item); @ (posedge vif.clk); vif.rst <= item.rst; @ (posedge vif.clk); vif.a_in <= item.a_in; vif.b_in <= item.b_in; vif.start <= 1'b1; @ (posedge vif.clk); vif.start <= 1'b0; for (int i = 0; i < `BW_A; i++) @ (posedge vif.clk); endtask endclass |
今回は、ドライバーの定義方法について解説しました。シリーズを通してご覧いただけると、UVM検証環境が構築できるようになりますので、ぜひ他のコンポーネントの解説もご覧ください。
シリーズ目次はこちら