

UVMの環境構築!(10) Test (テストコンポーネント)

UVMの環境構築!(9) Environment


UVMの環境構築第6回では、モニターの定義(作成)方法について解説していきます。
なお、ソースコードはGitHubに公開しています。
目次
UVMの環境構築!シリーズの目次は、第1回 解説編の一番下をご覧ください。
モニターはuvm_monitorまたはそのサブクラスを継承して定義します。
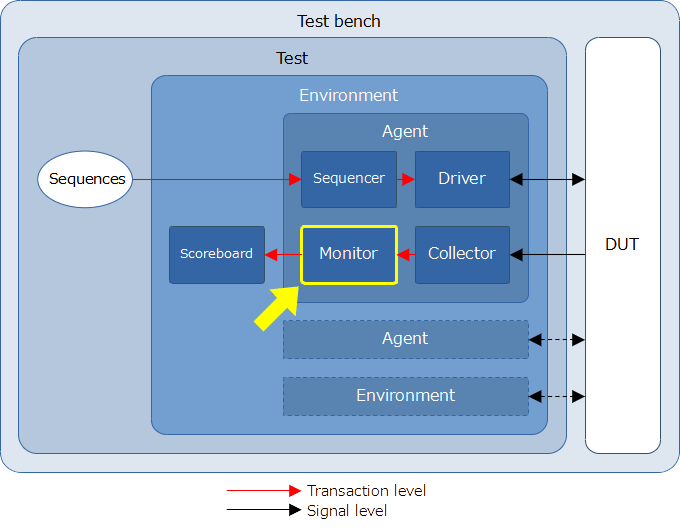
モニターはコレクターからDUTのレスポンス情報を受け取り、レスポンスのチェックやカバレッジ計算を行います。また、レスポンスの情報をほかのコンポーネントに送信します。レスポンスの情報はトランザクションでやり取りします。

ベースクラスとするuvm_monitorには、トランザクションを受け取るためのAnalysis exportと、トランザクションを送信するためのAnalysis portが定義されていません。したがって、ユーザーがAnalysis exportとAnalysis portを定義する必要があります。
今回は、まず基本的なモニター機能をもつmy_monitorを定義します。そして、my_monitorを継承して、カバレッジ計算機能を追加したmy_monitor_coverageを定義します。classの継承を利用して、このように機能追加することで、検証環境の再利用性が高まります。
それでは、ソースコードを見ながら、モニターの定義方法について解説します。
my_monitor.sv
1 2 3 4 5 6 7 8 9 10 11 12 13 14 15 16 17 18 19 20 21 22 23 | class my_monitor extends uvm_monitor; uvm_analysis_imp #(my_item, my_monitor) analysis_export; uvm_analysis_port #(my_item) item_collected_port; `uvm_component_utils(my_monitor) /* Constructor */ function new(string name, uvm_component parent); super.new(name, parent); analysis_export = new ("analysis_export", this); item_collected_port = new ("item_collected_port", this); endfunction /* Write() of analysis_export */ virtual function void write(my_item data); $display("@%4t: a_in = %d, b_in = %d, mult_out = %d", $time, data.a_in, data.b_in, data.mult_out); item_collected_port.write(data); endfunction endclass |
my_monitorにカバレッジ計算機能を追加します。
my_monitor_coverage.sv
1 2 3 4 5 6 7 8 9 10 11 12 13 14 15 16 17 18 19 20 21 22 23 24 25 26 27 28 29 30 31 | class my_monitor_coverage extends my_monitor; bit coverage_enable = 1'b1; /* Define cover group */ covergroup cg with function sample( bit[`BW_A - 1:0] a_in, bit[`BW_B - 1:0] b_in ); coverpoint a_in { bins a_value[] = { [1 : 200] };} coverpoint b_in { bins b_value[] = { [1 : 10] };} endgroup `uvm_component_utils_begin(my_monitor_coverage) `uvm_field_int(coverage_enable, UVM_DEFAULT) `uvm_component_utils_end /* Constructor */ function new(string name, uvm_component parent); super.new(name, parent); cg = new; /* Create an instance */ endfunction /* Override write() */ function void write(my_item data); super.write(data); if (coverage_enable) cg.sample(data.a_in, data.b_in); /* Coverage collection */ endfunction endclass |
3 4 | constraint CA { (a_in >= 1) && (a_in <= 200); } constraint CB { (b_in >= 1) && (b_in <= 10); } |
XilinxのVivado環境でのカバレッジ確認方法を説明します。なお、ここで説明する操作は、UVM環境構築&実行した後に行います。
シミュレーション終了後、Tcl Consoleで、下記を実行します。(MC_MULTは今回のプロジェクト名です。)
1 | xcrg -report_format html -dir ./MC_MULT.sim/sim_1/behav/xsim/xsim.covdb |
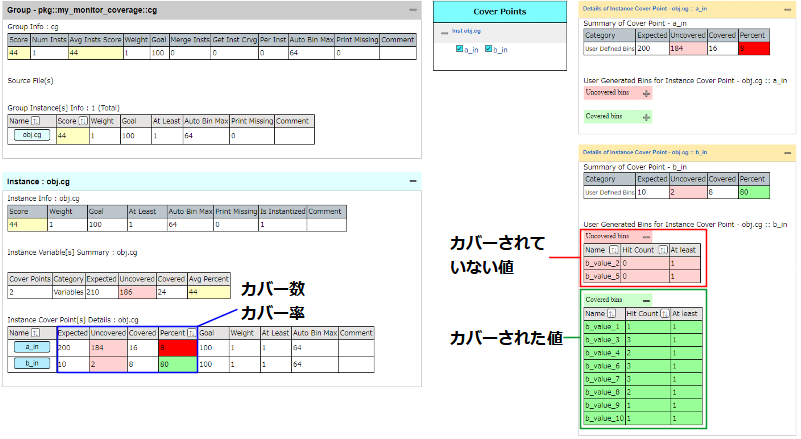
プロジェクトディレクトリ下に、xcrg_reportというディレクトリが生成されます。xcrg_report\groups.htmlをブラウザで表示することで、図2のようなカバレッジレポートが確認できます。

今回は、モニターの定義方法について解説しました。シリーズを通してご覧いただけると、UVM検証環境が構築できるようになりますので、ぜひ他のコンポーネントの解説もご覧ください。
シリーズ目次はこちら