
2022年10月12日

今回は、Xilinxの開発ツールVivadoに搭載されたVivado Simulatorで、UVMが動くことを確認してみたいと思います。ソースコードとプロジェクトファイルはGitHubで公開しています。
目次
UVMはUniversal Verification Methodologyの略です。論理回路のシミュレーションを行うためのライブラリです。SystemVerilogで記述されています。UVMはIEEE Std 1800.2-2017となっており、論理回路の設計者や検証(シミュレーション)の担当者にとって、必要なものとなっています。
その特徴は、検証環境の再利用を可能にすることで、検証の生産性を向上するという点にあります。
今回は、とりあえずUVMのライブラリが使えていることを試します。したがって、UVMのコンポーネント(機能ブロック)は1つだけです。本来は、シーケンサー、ドライバー、モニターなどいろいろ必要ですが、それは今後説明します。
ソースコードは3つです。
(1) print_comp.sv
UVMのコンポーネントはSystemVerilogのclassで記述します。このお試し用classは、uvm_componentを継承(extends)して作成しています。動作は、class内の変数(フィールド)をプリント(`uvm_info)するだけです。
1 2 3 4 5 6 7 8 9 10 11 12 13 14 15 16 17 18 19 20 21 22 23 24 | class print_comp extends uvm_component; int i = 2; string s = "dog"; `uvm_component_utils_begin(print_comp) `uvm_field_int(i, UVM_DEFAULT) `uvm_field_string(s, UVM_DEFAULT) `uvm_component_utils_end function new(string name, uvm_component parent); super.new(name, parent); endfunction function void build_phase(uvm_phase phase); super.build_phase(phase); endfunction function void end_of_elaboration_phase(uvm_phase phase); super.end_of_elaboration_phase(phase); `uvm_info("PRINT_COMP", $sformatf("i = %d, s = %s", i, s), UVM_LOW) endfunction endclass |
(2) pkg.sv
作成したすべてのclassをpackageにしておきます。次のtop.svのように、importして使うことで、すっきりした記述になります。
1 2 3 4 5 6 7 8 | package pkg; `include "uvm_macros.svh" import uvm_pkg::*; /* Include classes */ `include "print_comp.sv" endpackage |
(3) top.sv
トップモジュールです。環境によっては、`include “uvm_pkg.sv”が必要ですが、Vivado Simulatorでは不要でした。
print_compのインスタンスp1とp2を作成し、p2のフィールドの値をuvm_config_dbによって書き換えています。
1 2 3 4 5 6 7 8 9 10 11 12 13 14 15 16 17 18 19 20 21 22 23 24 | `timescale 1ns / 1ps //`include "uvm_pkg.sv" `include "uvm_macros.svh" `include "pkg.sv" module top(); import uvm_pkg::*; import pkg::*; print_comp p1, p2; initial begin `uvm_info("INFO", "Simple UVM", UVM_LOW) uvm_config_db#(int)::set(null, "p2", "i", 8); uvm_config_db#(string)::set(null, "p2", "s", "cat"); p1 = print_comp::type_id::create("p1", null); p2 = print_comp::type_id::create("p2", null); run_test(); end endmodule |
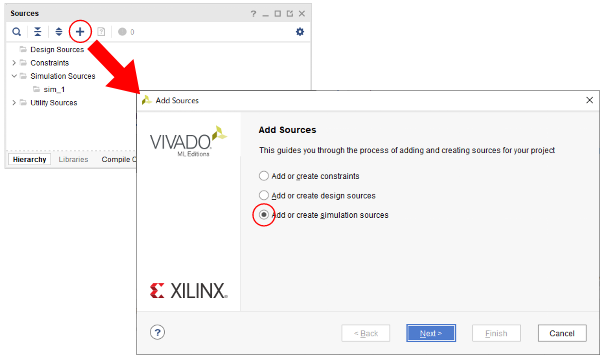
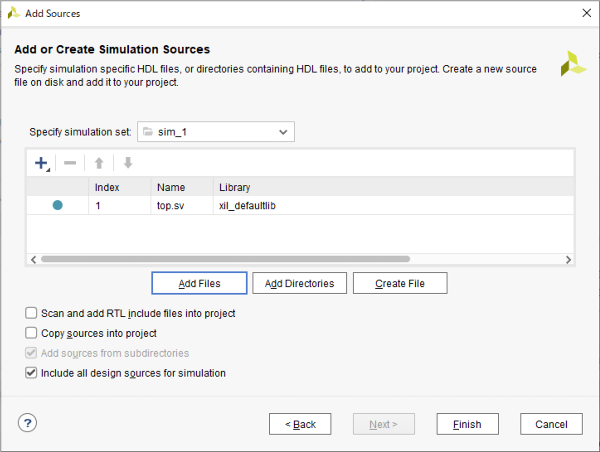
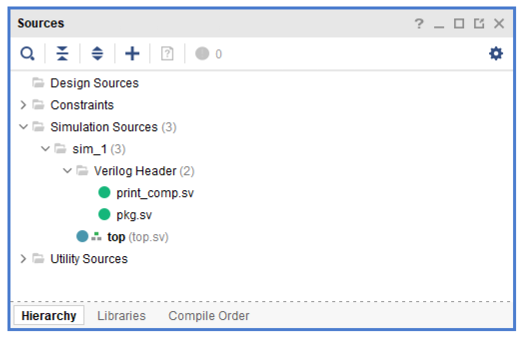
プロジェクト作成後、図1~図3の手順でソースコード読み込みます。
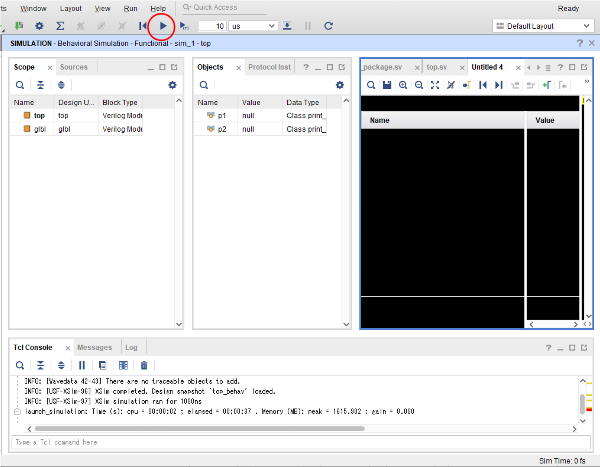
あとは、Vivadoの左側にあるFlow Navigatorから、SIMULATION → Run Simulation → Run Behavioral Simulation と選択します。
uvm.pkgのコンパイルに少々時間がかかります。
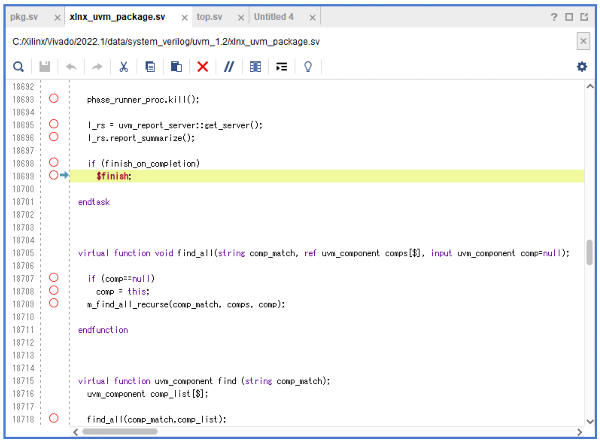
図4のような画面になったら、三角のRun Allボタンを押します。そうすると、図5のようにUVMパッケージ内の$finishにたどり着き、シミュレーションが終了します。
Printされた内容はTcl Consoleに出力されています。p1は、print_comp.sv内に記述した値を出力しているのに対し、p2は、top.svで変更した値が反映され、出力されています。
UVM_INFO C:/sim_1/top.sv(14) @ 0: reporter [INFO] Simple UVM
UVM_INFO @ 0: reporter [RNTST] Running test …
UVM_INFO C:/sim_1/print_comp.sv(25) @ 0: p1 [PRINT_COMP] i = 2, s = dog
UVM_INFO C:/sim_1/print_comp.sv(25) @ 0: p2 [PRINT_COMP] i = 8, s = cat
UVM_INFO C:/Xilinx/Vivado/2022.1/data/system_verilog/uvm_1.2/xlnx_uvm_package.sv(20867) @ 0: reporter [UVM/COMP/NAMECHECK] This implementation of the component name checks requires DPI to be enabled
UVM_INFO C:/Xilinx/Vivado/2022.1/data/system_verilog/uvm_1.2/xlnx_uvm_package.sv(13673) @ 0: reporter [UVM/REPORT/SERVER] [UVM/RELNOTES] 1
[UVM/COMP/NAMECHECK] 1
[RNTST] 1
[PRINT_COMP] 2
[INFO] 1
** Report counts by id
UVM_FATAL : 0
UVM_ERROR : 0
UVM_WARNING : 0
UVM_INFO : 6
** Report counts by severity
— UVM Report Summary —
今回は、簡単なコードを使って、Vivado SimulatorでUVMが動作することを確認しました。`uvm_infoによるログの出力に加え、uvm_config_dbによるフィールド値の変更ができました。
今後は、UVMのコンポーネントの開発方法について解説していきます。